
Chain Stocking the Hex Map
In my most-read-of-all-time blogpost, the Hexcrawl Checklist, I claim to not have a default method for creating the actual hexmap because “I’m a fucking hexmap artist, [and] each hexmap is a unique work of art.” While true, I do have a few different methods I use from time to time other than the more Bob Ross approach of painting little trees and mountains I describe in that post. The most common is to generate the map with my players using this collaborative method plus the tiles from Hexcrawl Toolkit. That has never failed to delight my players at the start of a campaign. But what about when I am prepping for a new area by myself and want to lean on a procedural oracle to guide my prep? Methods abound, but I’ll describe my own technique after first boring you with some history.
The first time I used a procedural tool for generating a hexmap was probably Mausritter. Mausritter has a fairly simple method for populating the hexmap, which involves rolling 1d6 for the hex terrain type, 1d20 for a landmark (based on the terrain type), and d6/d8 for further details about the landmark. All well and good, but I had an issue with the first step in practice. Each roll was independent of the prior rolls or the terrain surrounding the hex. So hexes with a “river” type would rarely line up as a river, and “forests” would dot the land randomly instead of forming clusters. It made for a fairly ugly type of map. Here is an example, which is perfectly cromulent and usable, but I am a sicko and rarely satisfied by mere cromulism.
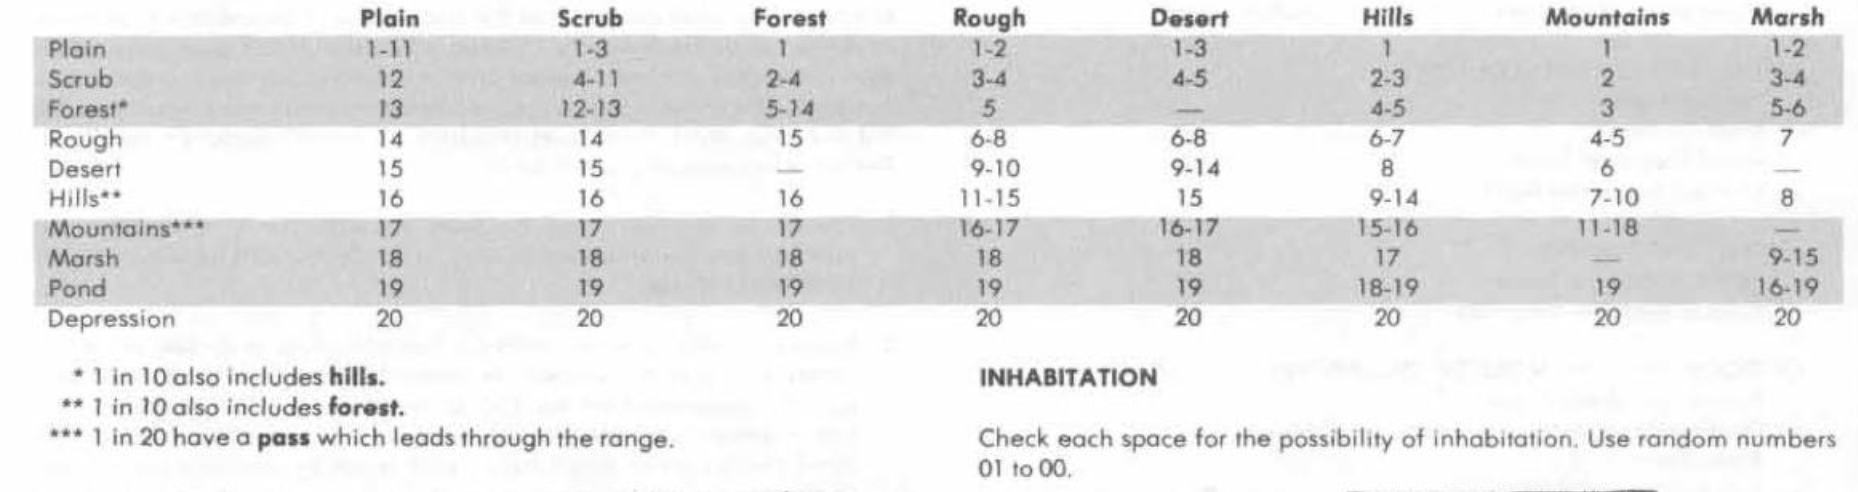
Gary Gygax said a lot of shit. It’s hard to keep track of it all. Shit like “You can’t have a meaningful campaign without a map”. But sometimes he said some helpful shit too. Like in Appendix B of the original Dungeon Master’s Guide, he had his own set of rules for generating the contents of a hex on the fly, which rise above mere cromulism albeit with all the typical Gygaxian fiddliness. The benefit of this method over Mausritter’s procedure is that each hex takes into account the hex from which the players were traveling (this method was designed to be deployed in play, not as part of prep), so if you are coming from a mountainous hex, the adjacent hex had a higher likelihood of being more mountains than if you were coming from a desert. It’s probably easier to understand this method by looking at the matrix, which will also illustrate what I meant by being a bit fiddlier than is my usual preference.
I like the simplicity of Mausritter’s 1d6 hex terrain type procedure but wish it had the contextual qualities of Gygax’s random wilderness terrain generator. Because I am a game designer (we all are), I can grant my own wish. Behold! The Chain Stocking method for hex maps:
Starting with the centermost hex and working your way out in a spiral, following the steps below for each wilderness hex.
1. Decide whether the region is frigid (i.e., cold zones near the poles), torrid (i.e., hot zones near the equator), or temperate (i.e., mild zones between those extremes).
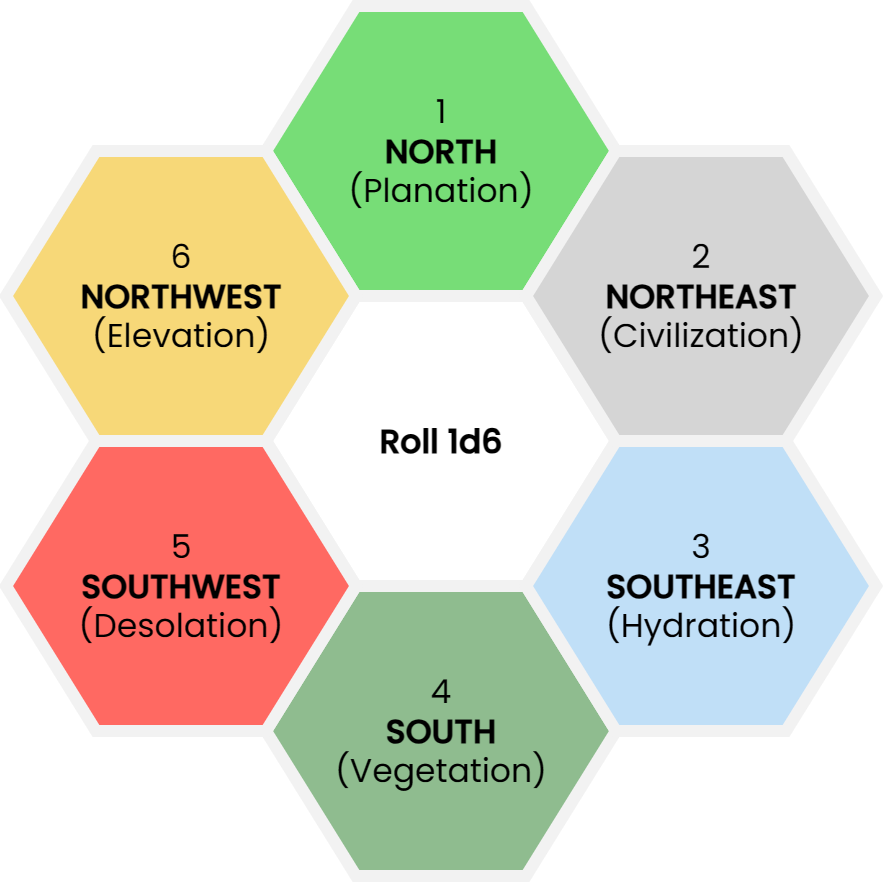
2. Roll 1d6 for hex type.
a. If there is a stocked hex in the direction indicated (e.g., on a 1, the hex to the north), then this hex is of the same type as the stocked hex.
b. If there is a blank hex in the direction indicated, then fill in the hex with the hex type indicated (e.g., on a 1, the hex is Planation).
3. Fill in the hex type by writing the letter (e.g., “P” for Planation) in pencil.
4. Once all of the hexes on the map are filled in with the hex type, for each hex determine the hex contents based on the hex type as each is described below. Run down the conditional statements in order. The first conditional statement that is true determines the dominant terrain of the hex (I don’t usually do this in order, I usually start with Hydration and Elevation, then Civilization before moving onto the remaining hex types).
These are basically just guidelines. In practice, I do what feels right, so this is an attempt to lay out some rules for “what feels right” in practice.
(1) Planation
If in a torrid zone, it is a savanna
If in a frigid zone, it is a tundra
If a hamlet or larger settlement is in an adjacent hex, choose a plain, prairie, downs, pasture, farmland, or meadow
Otherwise, chose a steppe, heath or moor
(2) Civilization
If it is surrounded by Hydration terrain on all sides, choose a castle or hamlet on a rocky terrain
If it is nearly surrounded by Hydration terrain, choose a town (or city if there is at least one adjacent Civilization hex) with a port
If there are three or more adjacent Civilization hex types, it is a city
If there are two adjacent Civilization hex types, choose a town or city (city if it is adjacent to Hydration terrain)
If there is one adjacent Civilization hex types, choose a village, town or castle
If there is a Civilization hex type within two hexes, choose a hamlet, village, castle or ruin
If there is no Civilization hex type within two hexes, choose a thorp, hamlet or ruin
Special: The terrain in this hex that the settlement is built on is the same as the predominant (3+ adjacent hexes) hex type or the most suitable terrain in an adjacent hex (suitability is typically in the following order: Planation, Hydration (coastal or floodplain terrain), Vegetation, Elevation, and Desolation. Settlements in Vegetation hexes are more likely to be elven settlements, and settlements in Elevation hexes are more likely to be dwarven settlements.
(3) Hydration
If it is adjacent to at least three Desolation hexes, it is an oasis
If there is a line or branching lines of Hydration hexes, it is a river
If there is a cluster of three or more Hydration hexes that stretch to the edge of the map, it is an ocean or sea
If there are other hex types inside this cluster, they form an island
If there is a cluster of three or more Hydration hexes in a temperate zone, choose a marsh, fen, slough, swamp, bog, quagmire, or morass, and a river runs through the longest stretch of hexes
If there is a cluster of two or more Hydration hexes in a torrid zone, choose a marsh, fen, slough, swamp, bog, quagmire, or morass, and a river runs through the longest stretch of hexes
If it is adjacent to a Elevation hex, it is a tarn
Otherwise, it is a lake, ponds, or pools
(4) Vegetation
If it is in a torrid zone, it is a jungle
If it is in a frigid zone, it is a taiga
If there is as least one adjacent Vegetation hex, choose a forest, woods, groves or copses
Otherwise, choose a scrub, brush, veldt, bush, thicket or brackens
(5) Desolation
If it is in a torrid zone, it is a desert
If it is part of an island (i.e., small landmass surrounded by ocean or sea hexes), it is a desert island
If it is in a frigid zone, it is a snowfield
Otherwise, choose a badland, barren, waste, depression, gorge, flats, rift, valley or canyon
(6) Elevation
Roll 2d6, and if you roll a 12, it is a volcano
If it is a frigid zone, it is a glacier
If it is adjacent to a desert hex, it is a dune
If it is adjacent to a Planation hex and no Elevation hex, it is a mesa
If there is at least two adjacent Elevation hexes, it is a mountain
Otherwise, choose hills, ridges, bluffs or highland
Example:
[Blogger’s Note: I hexfill in a clockwise spiral so I am presenting these in order rolled but using the hex numeration from the hex workbook I used. When I write down my notes to prep for a game, I would probably list them in alphanumerical order for ease of reference but am listing in spiral order here just to demonstrate how I interpreted each result in order. Hopefully it’s not too confusing]
Purely arbitrarily, I decided that this region will be in a temperate zone. This exercise didn’t take more than a half hour, not counting writing it out in blog format.
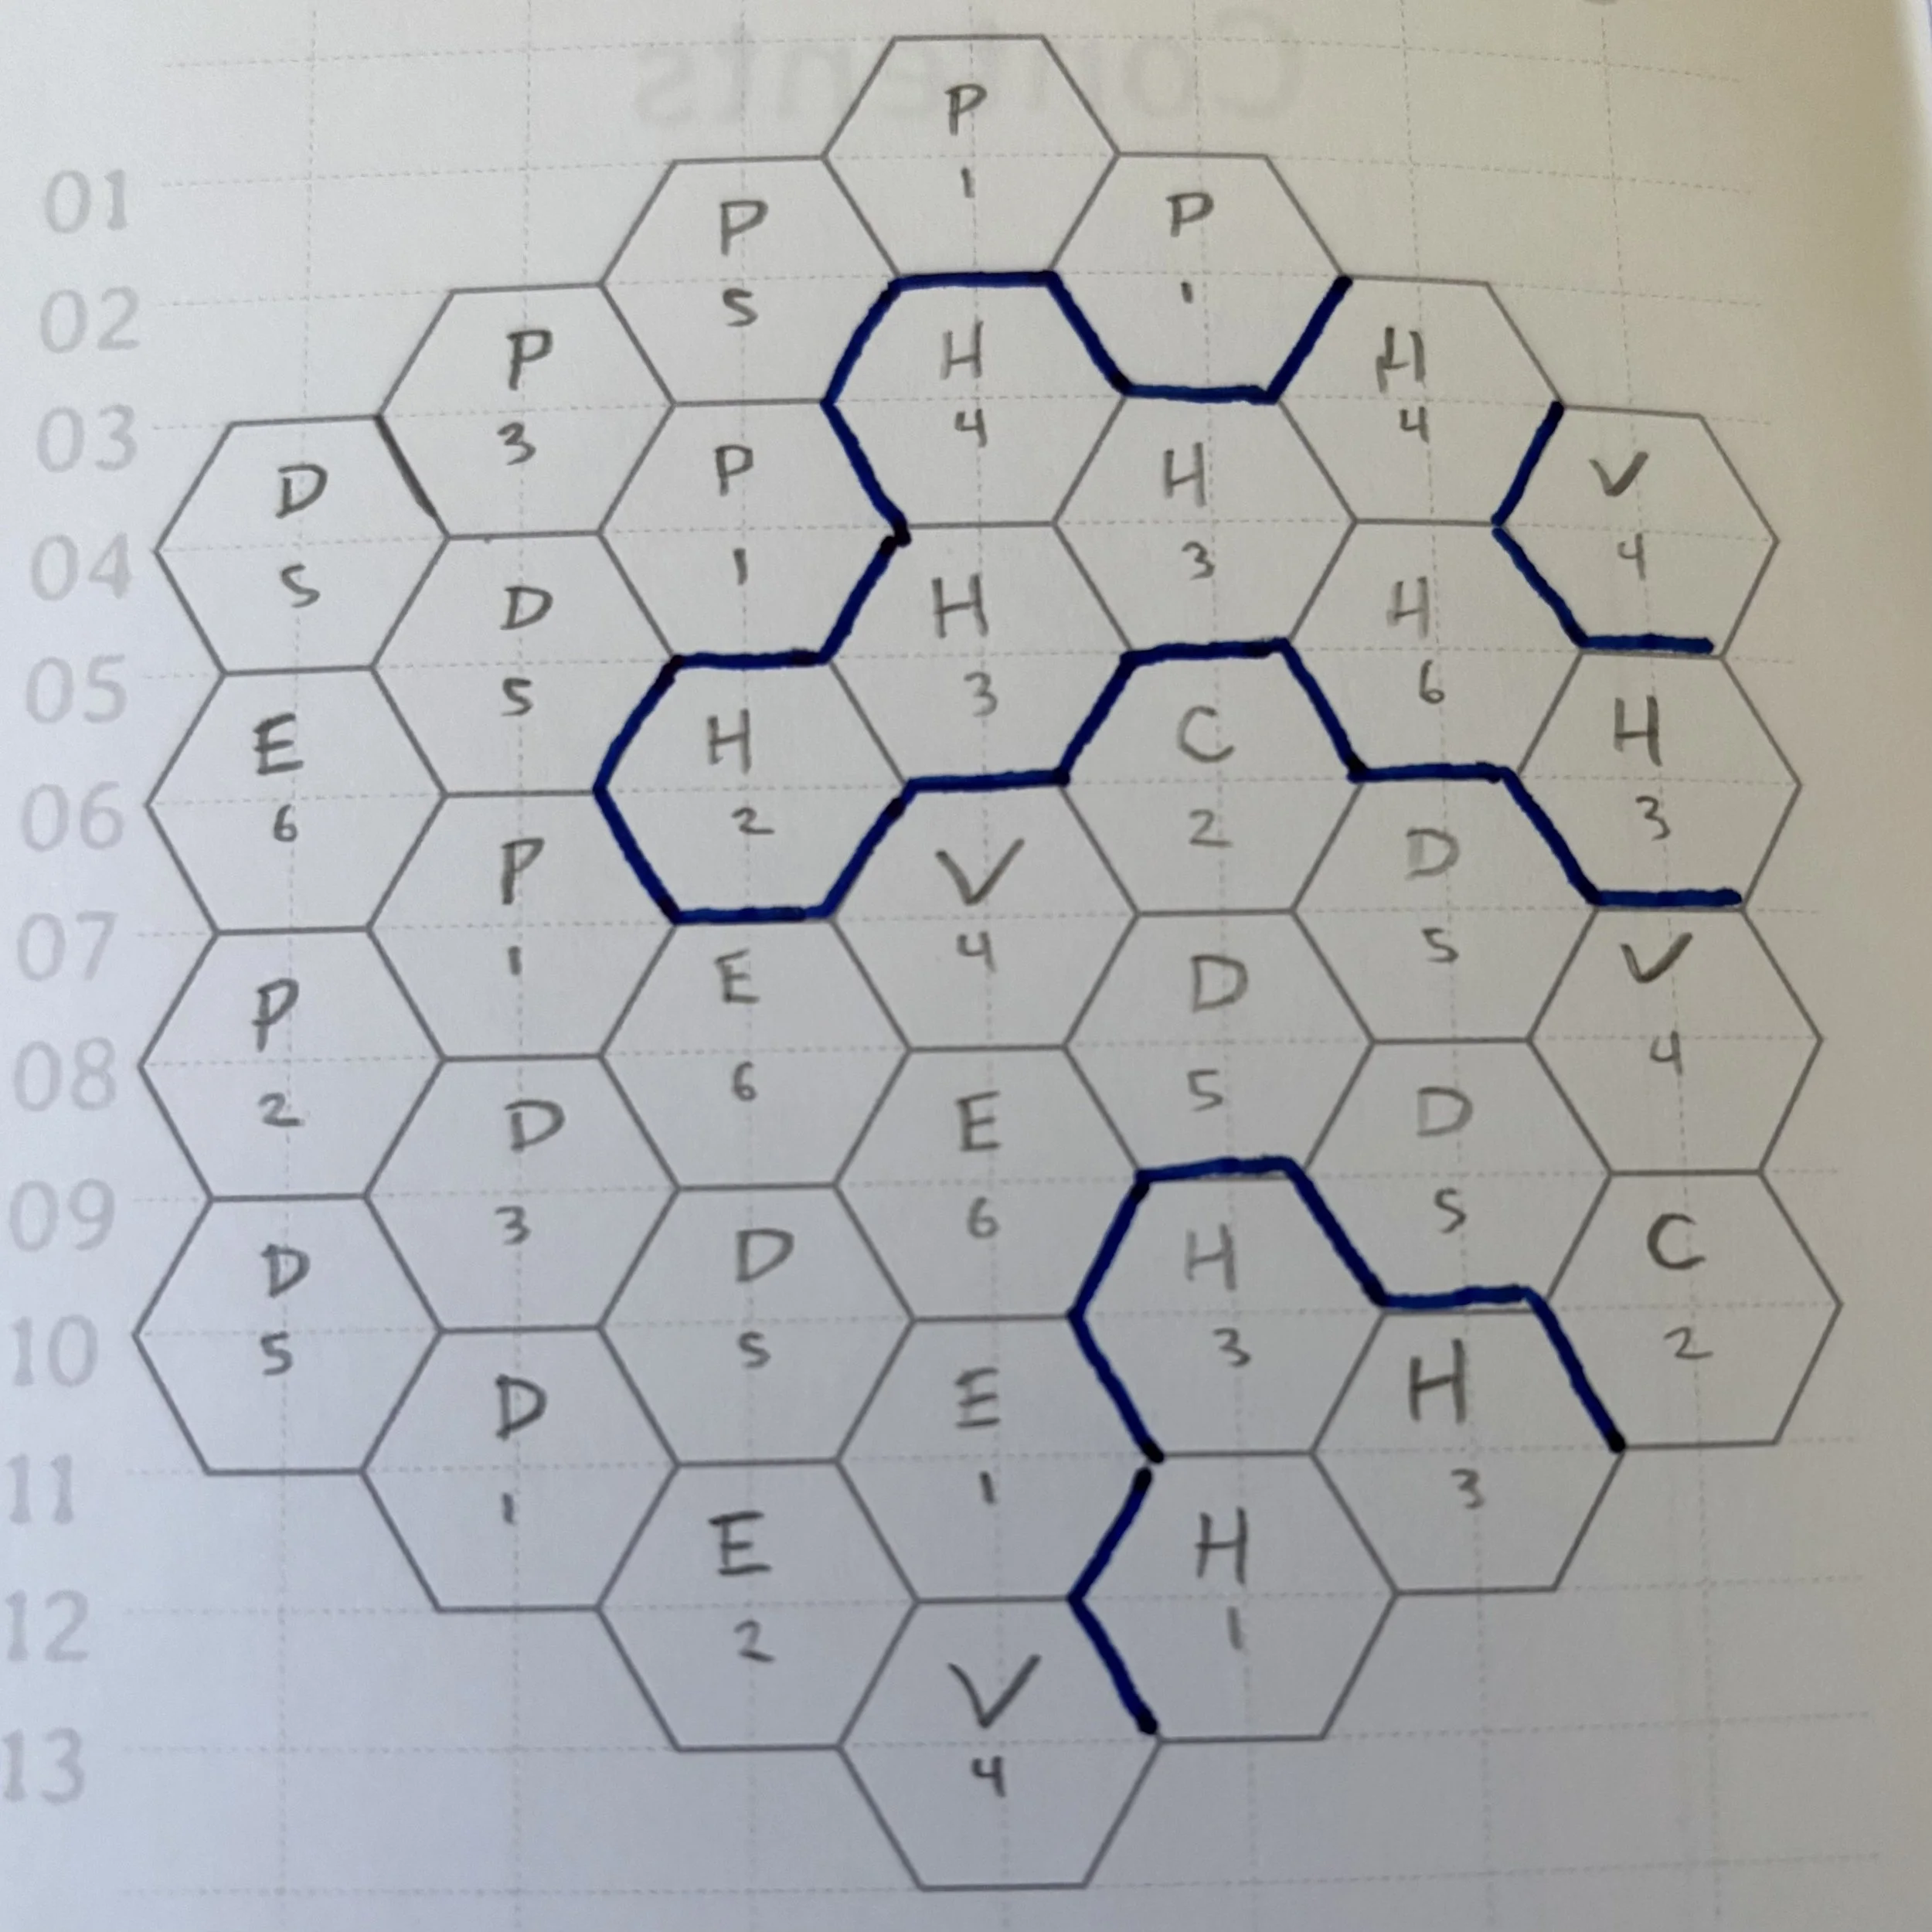
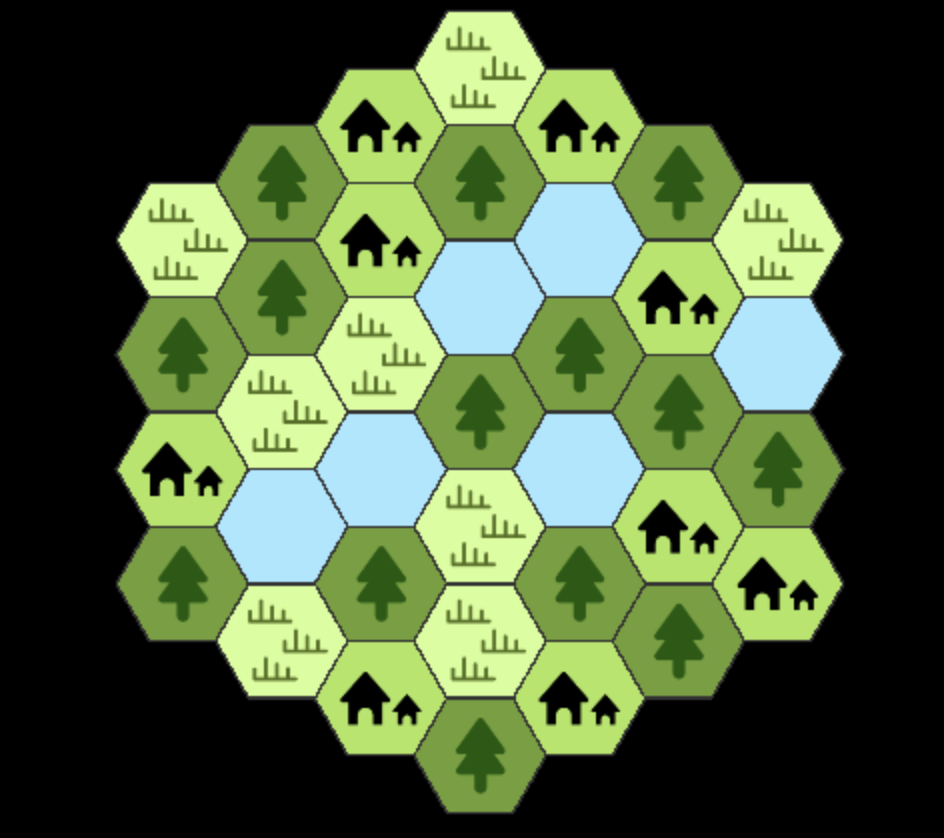
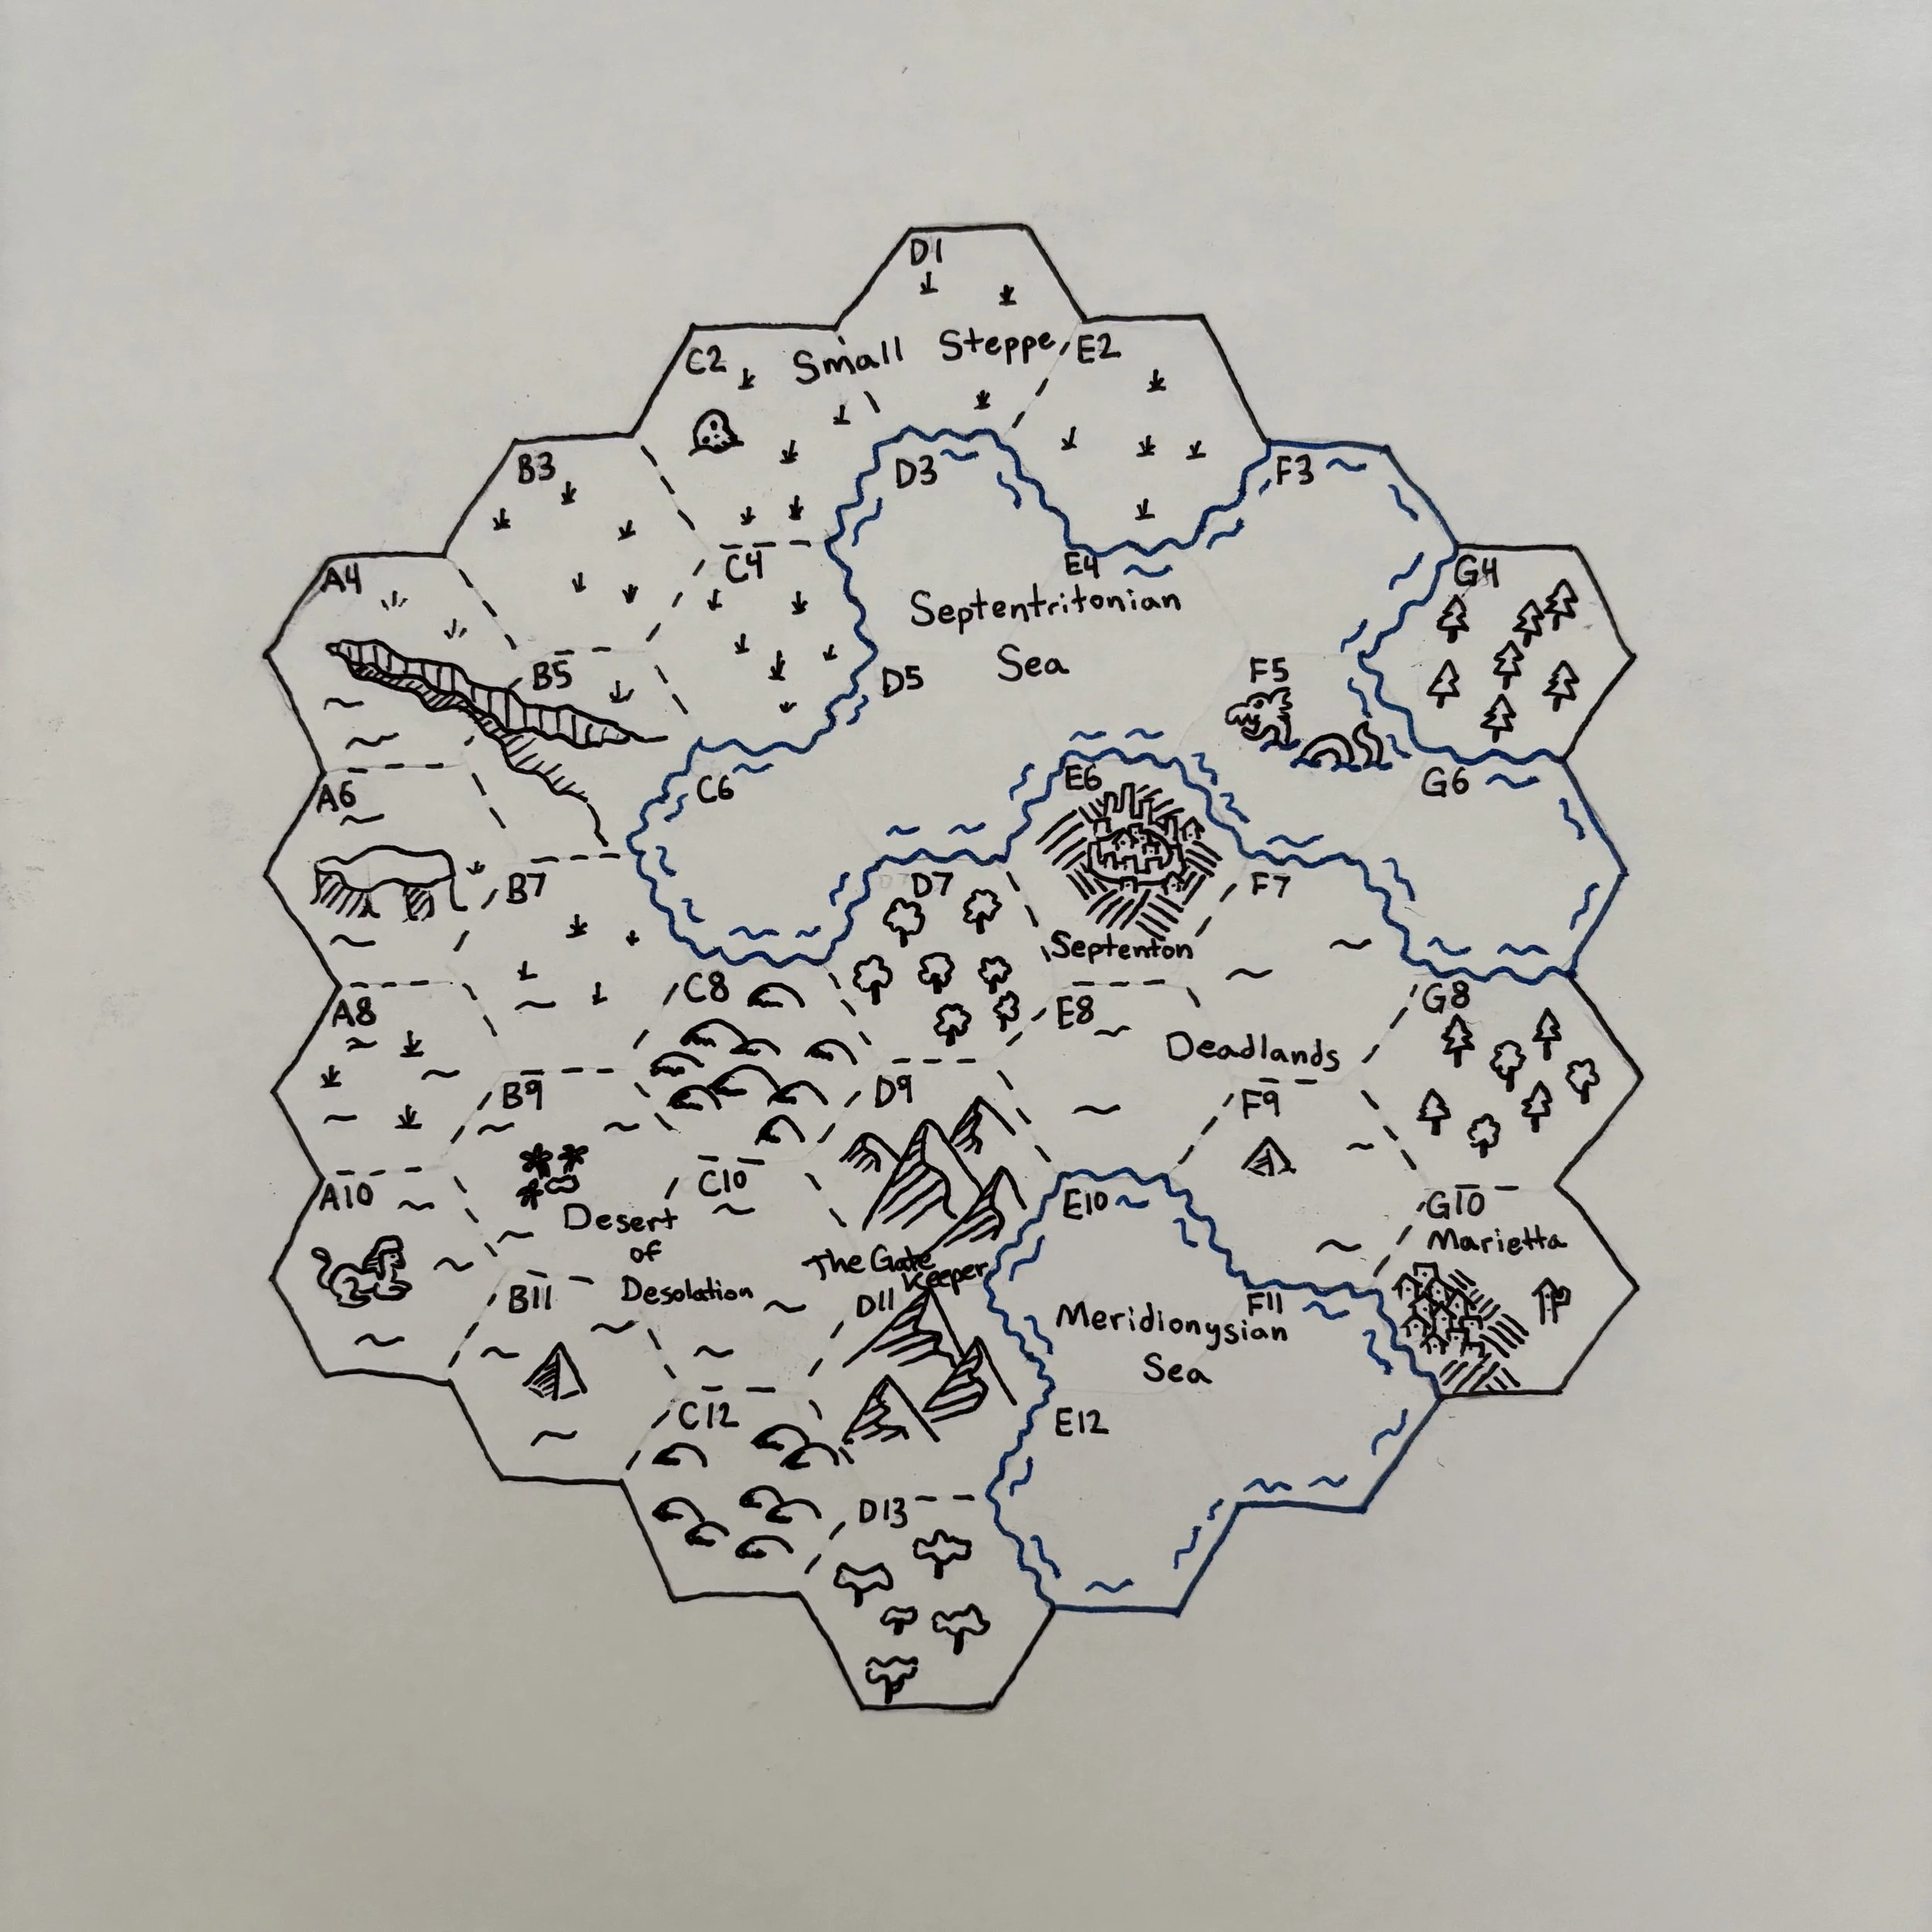
This was just my notes as I rolled the hexes. At. the end of this exercise (and the end of this post), I draw the hexes to actually visualize the landscape.
Central Hex:
D07: Rolled a 4. Because the hex to the south is blank, this hex is Vegetation. At the end of this process, I can tell there aren’t any adjacent Vegetation hexes, so I decide this is just a thicket.
First Circle:
D05: Rolled a 3, which indicates Hydration in the absence of anything to the southeast. Later I can tell that this is part of a large cluster of Hydration hexes, so this is an ocean. I’ll call this cluster of hexes the “Septentritonian Sea”.
E06: Rolled a 2, which indicates Civilization since nothing is northeast yet. After rolling, I can tell there are enough ocean hexes around it that this can be a town with a port. If it had some more adjacent Civilization hexes, I could upgrade it to a city, but this region will turn out to be sparsely settled (which makes sense because this method should roughly correspond to the odds in Gygax’s procedure, which absolutely suggests a possibly post-apocalyptic/frontier setting). I will call this port town “Septenton".
E08: Rolled a 5, which indicates Desolation in the absence of anything to the southwest. I decide these are wastelands. Because this 3-hex region separates the only two pockets of Civilization hexes on the map, I decide that perhaps these points of light have previously been at war or some other conflict, and the area between them have been desolated by magical warfare. I will call this area the Deadlands.
D09: Rolled a 6, which indicates Elevation in the absence of anything to the northwest. The 2d6 roll indicates this is no volcano. Because there will be two adjacent Elevation hexes, this will be a mountain. This range of Elevation hexes cuts off what looks like might become a civilized peninsula from an unsettled area, so I name this mountain the "Gatekeeper".
C08: Rolled a 6, which indicates more Elevation. With only one adjacent Elevation hex, this will be foothills for the Gatekeeper.
C06: Rolled a 2, which would ordinarily mean Civilization, but because D06 to the northeast is Hydration, this is as well. This is part of the Septentritonian Sea.
Second Circle:
D03: Rolled a 4, which would be Vegetation, but since D06 to the south is Hydration, this is more of the Septentritonian Sea.
E04: Rolled a 3, indicating Hydration. The Septentritonian Sea continues.
F05: Rolled a 6, which is Hydration by virtue of E04 to the northwest. The Septentritonian Sea continues.
F07: Rolled a 5, which is Desolation because of E08 to the southwest, but would be Desolation regardless. This is part of the Deadlands region.
F09: Rolled a 5, which is more Desolation for the Deadlands.
E10: Rolled a 3, which is Hydration. This doesn’t (at least yet, they may connect as the map expands) seem to be part of the Septentritonian Sea. However, it is a cluster of three or more Hydration hexes stretching to the edge of the map, so this is more ocean. I will name this the Meridionysian Sea.
D11: Rolled a 1, which is Elevation due to D09 to the north. Because there will end up being two adjacent Elevation hexes, this is more mountains. I decide this is also part of the Gatekeeper, a mountain that spans two hexes in its footprint.
C10: Rolled a 5, which indicates Desolation. I decide this and the Desolation hexes that will end up adjacent to it are a desert in the shadow of the Gatekeeper. In my checklist, it only suggests desert when the zone is torrid, but maybe we are moving a bit closer to the equator here. Or maybe those guidelines aren’t hard and fast rules. We will call this cluster of Desolation hexes the “Desert of Desolation”. Hmm, I wonder if there is any existing module I could just plug in here.
B09: Rolled a 3, which is more Desolation because of C10 to the southeast. It’s part of the Desert of Desolation.
B07: Rolled a 1, which indicates Planation in the absence of anything to the north. There are no nearby settlements, so I decide this is just moorlands. With only two hexes (at least in this map, it may expand as we expand the map), it’s not quite big enough yet for me to decide to name the region, but that’s a matter of taste.
B05: Rolled a 5, which indicates Desolation in the absence of anything to the southwest. I choose to make this a canyon, possibly with a small river at the bottom that feeds into the Septentritonian Sea.
C04: Rolled a 1, which means Planation. This area, which I determine are steppelands, is going to end up a sizable cluster dominating the northern shores of the Septentritonian Sea. I’ll name it the Small Steppe.
Third Circle:
D01: Rolled a 1, so the Small Steppe takes a giant leap in the size of its territory.
E02: Rolled a 1, and the Small Steppe continues.
F03: Rolled a 4, which indicates Hydration because that is what F05 to the south is. So this is part of the Septentritonian Sea.
G04: Rolled a 4, but this time the hex to the south is blank so it indicates Vegetation. This is a little thicket on the shore, but perhaps if we expanded our map, it would grow into something more.
G06: Rolled a 3, which indicates Hydration since there is nothing to the southeast. This is the final hex for the Septentritonian Sea, the largest continuous set of hex types on the map.
G08: Rolled a 4, which indicates Vegetation. This is a veldt.
G10: Rolled a 2, which indicates Civilization. This is a very uncivilized region! This is another port town by the sea, and we will name it “Marietta”. It has long been at war with its neighbor, Septenton.
F11: Rolled a 3, which indicates Hydration. This is connected to E10, so it will be part of the Meridionysian Sea.
E12: Rolled a 1, which is also Hydration because of E10 to the north. This rounds out the parts of the Meridionysian Sea that are visible on our map.
D13: Rolled a 4, which indicates Vegetation with nothing to the south. This is so far south, let’s say it's a jungle. With any luck it will be just the tip of a larger jungle to the south of this region.
C12: Rolled a 2, which indicates Elevation because of D11. A rolled a 2 on 2d12, so this is not a volcano. This hex will be another set of foothills for the Gatekeeper mountain.
B11: Rolled a 1, which is Desolation because of B09 to the north. This continues the Desert of Desolation region.
A10: Rolled a 5, which is also Desolation since there is nothing to the southwest. This concludes the Desert of Desolation region.
A08: Rolled a 2, which makes this Planation because of B07 to the northwest. Like its neighbor, it is more moorland land.
A06: Rolled a 6, which is Elevation since nothing is to the northwest. I rolled a 10 on 2d6, so this is not a volcano. If it were a little to the south, it could be a dune as part of the Desert of Desolation. But instead, since it is adjacent to a Planation hex and no Elevation hex, it is a mesa.
A04: Rolled a 5, which indicates Desolation with nothing to the southwest. This continues the canyon from B05.
B03: Rolled a 3, which indicates Planation since that's what C04 to its southeast is. The Small Steppe region continues.
C02: Rolled a 5, which is more Planation due to C04 to its southwest. Thus ends both the Small Steppe region and my example hex map generation process.
A lot more work (legwork?) is needed to make this fully gameable (see, e.g., my aforementioned Hexcrawl Checklist), but this procedure at least gives you a solid base of terrain to start sprinkling in all the other details that makes a hexcrawl campaign really sing. This is literally just the geography (with rough indications of settlements), but it’s the people of the region (the settlements, the factions) that start to make a world feel like a world and not just a map.
A baked-in drawback of this method is that certain terrain types are going to appear more frequently in certain directions of the map. That may be obvious from the procedure itself, but it is worth noting because of how you can adjust this drawback to fit your circumstances. If you have a general idea of what the region you are using this procedure looks like (e.g., in what direction is the ocean, where are the mountains, in which direction have most folks settled), then you should change the designations for each of the enumerated results to align with that information. For instance, if I were stocking a hexmap that I ultimately want to resemble California, I’ll move Vegetation to the #1 (North) result, Elevation to #2 (Northeast), Desolation to #3 (Southeast), Hydration to #5 (Southwest), and Civilization to #6 (Northwest), which roughly correspond to where those types of terrain are found on America’s left coast.
Procedural generation can be a lot of fun, in that it makes prep almost a solo game that the referee can play in between sessions (Lord knows that referees can’t get enough of ideating on their game). However, it is never the end-point for a good hex map or dungeon or anything else you are cooking up for your players. The most important ingredient is love.
My blog posts are shared early as a reward to all of my Patreon supporters. If you want to support my blog, games, and get early access to all such endeavors, then get thee hence to my Patreon. You can also support my efforts by buying any of my games from my shop.